Setting Up
In this day and age, you cannot ship a website with clunky feeling authentication. Your users deserve an email and password (standard, especially security conscious users who do not like linking accounts), sign-up and sign-in via magic links ( the growing favorite for its convenience) and social login options like Google, Meta, GitHub, etc.
This Auth module is going to help you get a secure authentication up and running efficiently including pages/views that you can easily customize if you desire to.
What comes packed in ?
- Email and Password authentication
- Magic Link Authentication
- Google Social Login (maybe)
- The
requireAuthmiddle-ware for authorization - Reset password functionality baked in
- Secure email update
- Crucial user interface (Sign In, Sign Up, Reset Password, Profile)
Connect to a DB.
First step to get authentication and authorization is to simply connect to a database to actually store our user data. Since ApexKit ships with the wonderful Better Auth. You are not locked into any service like Okta or Clerk, nor do you need to write roll-out your own authentication from scratch and spend your time writing hashing, salting and all the crucial pieces of authentication. \ \ We will use Supabase here for our DB. But you can use any PostgreSQL solution like Neon, Aiven Cloud, or Railway.
https://supabase.com/docs/guides/database/connecting-to-postgres
{% hint style="warning" %} Note: We will use Supabase database, not Supabase Authentication
- Go to Supabase
- Create a free account.
- Set up your organization.
- Then simply create a new database for your project. This will prompt you to create a new database with a password. Keep this password safe with you. On your header, you should see a Connect button.
5. Get a connection string (that works with both IPv6 and IPv4)
{% hint style="danger" %} Important: We recommend using Transaction Pooler because Supabase uses IPv6 by default. And you might need IPv4 depending on where you are from. This is a way to avoid dealing with connection issues.
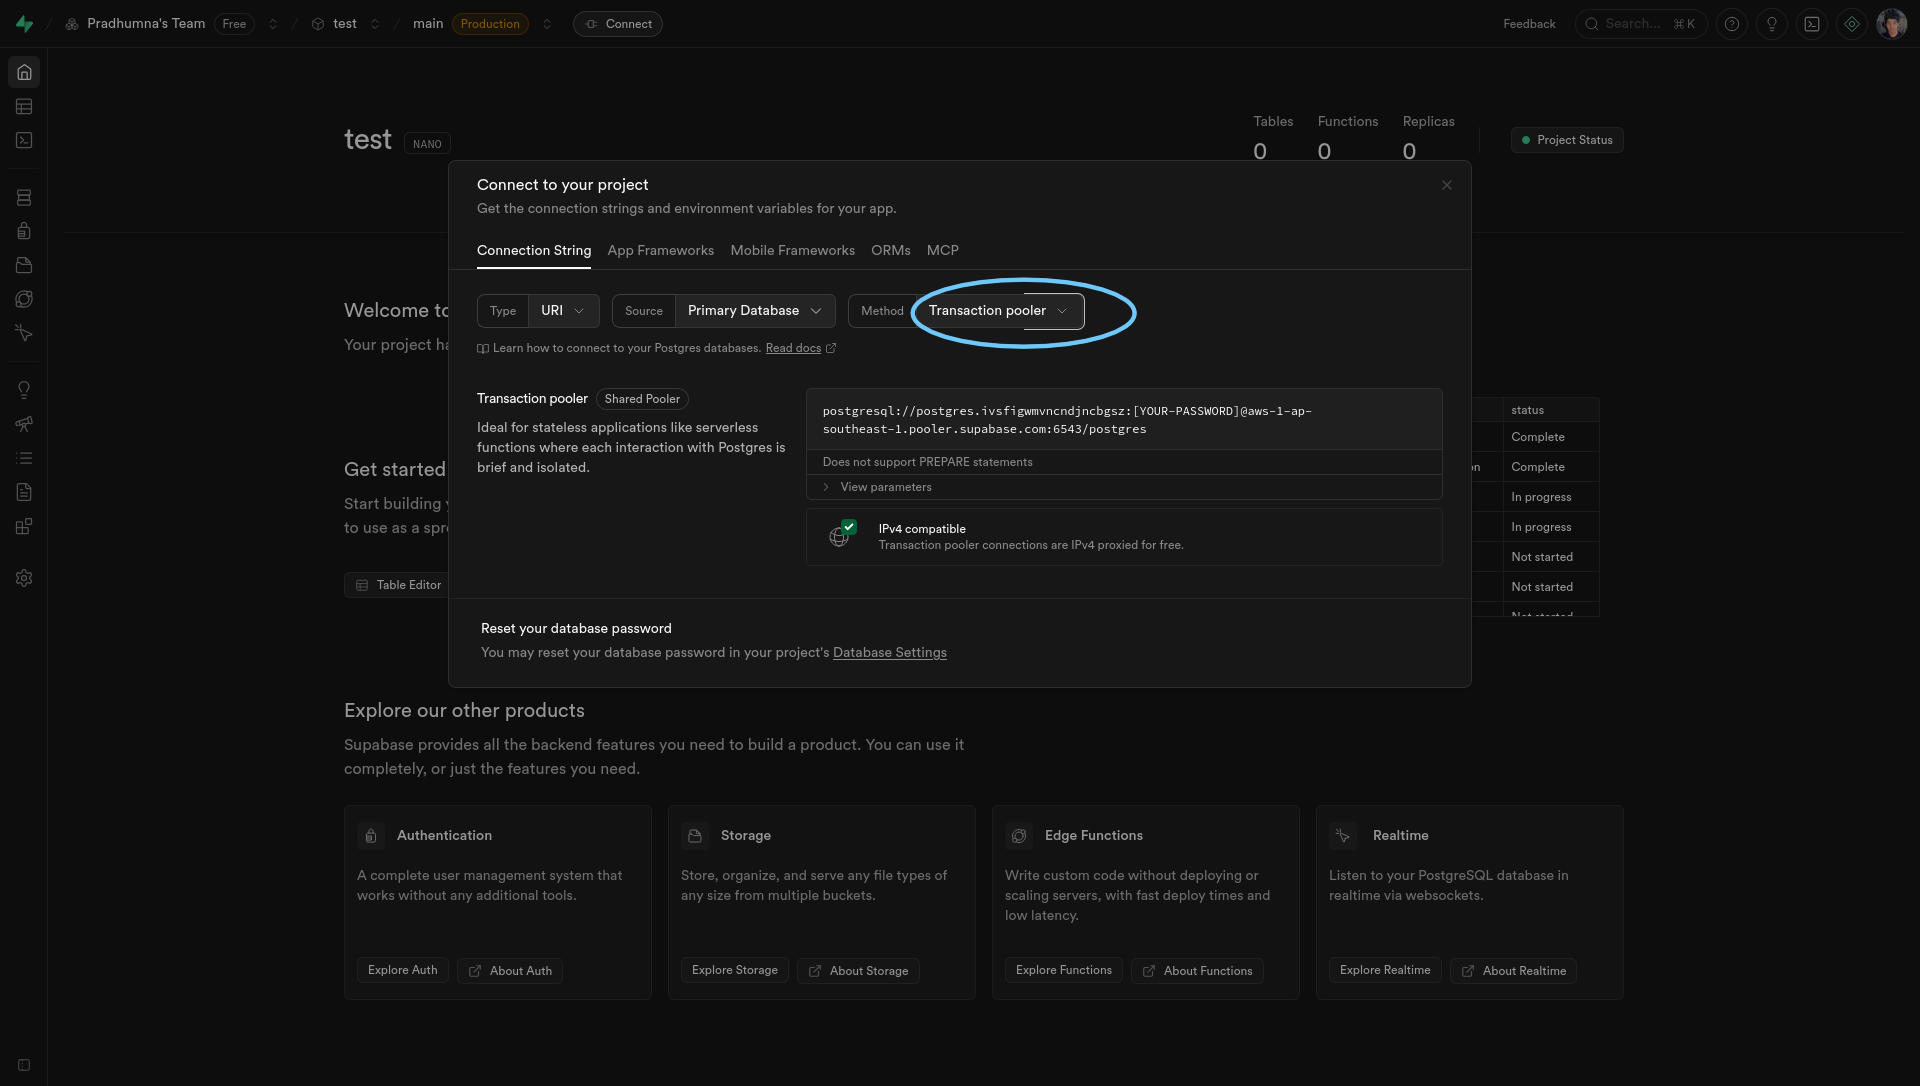
Your connection string should look something like this.\
postgresql://postgres.ivsfigwmvncndjncbgsz:[YOUR-PASSWORD]@aws-1-ap-southeast-1.pooler.supabase.com:6543/postgres
{% hint style="info" %} Heads Up: Make sure to swap the [Your-Password] with your actual password.
- Get your environment variables.
You need three environment variables to get authentication up and running. They are,
DATABASE_URLThis is your db connection stringBETTER_AUTH_SECRETA secret phrase that better-auth will use for operations like hashing.EMAIL_API_KEYThis will take care of sending emails for verification and magic links.
There is an example file aptly named .env.example . Just use those variable names in your development and production.
You can see how to get the DATABASE_URL in the previous section. For BETTER_AUTH_SECRET , you can choose any word or phrase. Just make sure to keep it safe. And lastly, for your EMAIL_API_KEY , grab one from https://resend.com/.
{% hint style="info" %} Note: This kit currently uses Resend underneath for emails due to their generous free plan and affordable paid plans. [^1]
- Understanding the schema
This kit ships with a Better-Auth compatible authentication schema with user, session, account, verification tables. You can modify this table and add as many fields according to your own restrictions and flexibility as long as you provide the core fields that Better-Auth needs to help roll-out a secure authentication.
We store all of our database related code in aptly named directory db
You can take a quick peek at the auth schema here:
{% code expandable="true" %}
// db/schema/auth.ts

import { pgTable, text, timestamp, boolean, uuid } from "drizzle-orm/pg-core";

export const user = pgTable("user", {
  id: text("id").primaryKey(), //Better-Auth expects this.
  name: text("name").notNull(),
  email: text("email").notNull().unique(), // one account per email
  emailVerified: boolean("email_verified").default(false),
  image: text("image"),
  createdAt: timestamp("created_at").defaultNow().notNull(),
  updatedAt: timestamp("updated_at").defaultNow().notNull(),
});

export const session = pgTable("session", {
  id: text("id").primaryKey(),
  expiresAt: timestamp("expires_at").notNull(),
  token: text("token").notNull().unique(),
  userId: text("user_id")
    .notNull()
    .references(() => user.id, { onDelete: "cascade" }),
  createdAt: timestamp("created_at").defaultNow().notNull(),
  updatedAt: timestamp("updated_at").defaultNow().notNull(), // Better Auth NEEDS This
  ipAddress: text("ip_address"), // Better Auth NEEDS This - tracks user's IP
  userAgent: text("user_agent"), // Better Auth NEEDS This - tracks browser info
});

export const account = pgTable("account", {
  id: text("id").primaryKey(),
  accountId: text("account_id"), // Better Auth needs this
  userId: text("user_id")
    .notNull()
    .references(() => user.id, { onDelete: "cascade" }),
  providerId: text("provider_id").notNull(),
  providerAccountId: text("provider_account_id").notNull().default("none"),
  accessToken: text("access_token"),
  refreshToken: text("refresh_token"),
  idToken: text("id_token"),
  accessTokenExpiresAt: timestamp("access_token_expires_at"),
  refreshTokenExpiresAt: timestamp("refresh_token_expires_at"),
  scope: text("scope"),
  password: text("password"),
  createdAt: timestamp("created_at").defaultNow().notNull(),
  updatedAt: timestamp("updated_at").defaultNow().notNull(),
});

export const verificationToken = pgTable("verification_table", {
  identifier: text("identifier").notNull(),
  token: text("token").notNull(),
  expires: timestamp("expires").notNull(),
});
export const verification = pgTable("verification", {
  id: text("id").primaryKey(),
  identifier: text("identifier").notNull(),
  value: text("value").notNull(),
  expiresAt: timestamp("expires_at").notNull(),
  createdAt: timestamp("created_at").defaultNow(),
  updatedAt: timestamp("updated_at").defaultNow(),
});
- Talking to your database.
The ApexKit uses two libraries to make authentication work without vendor lock-ins. Better-Auth library to give us all the authentication features like email and password, magic links, sessions, two-factor authentication and much more. And then we use Drizzle to actually talk to our database and store information in it. \
\
In order to move forwards, once you have settled on your auth schema (stick to the default or update according to your needs), we need to validate and push it to our database.\
\
You have your database, but it needs tables, relational mapping, restrictions etc. You may even need to update this later on after you have already stored some user data. We can do all of this with drizzle-kit.\
\
This kit has simple scripts to make easier for you to perform these operations.
// package json
    "db:gen": "drizzle-kit generate",
    "db:push": "drizzle-kit push",
    "db:migrate": "drizzle-kit migrate"
Some familiarity with SQL and Relational Databases would be helpful here. But if you haven't worked with them before, it's okay. This kit will reduce overhead significantly and you can pick-it up as you go if you'd like to.
Changes in your database schema are stored under "migrations". If you change anything in your schema, you need to make sure it is valid i.e it works well with existing database and doesn't break things. And all of our migrations are configured to store inside db directory.
We will primarily use npm run db:gen and npm run db:migrate. The command npm run db:push is only used during testing but not ideal for production.
npm run db:gen will check if you made any changes to your schema files compared to last migrations.
npm run db:migrate will perform these migrations (changes) to your database safely. This can be anything like adding a new field or changing default value.
After performing these two commands, you should see tables created in your database.
{% hint style="success" %} Congratulations! You just setup your project with a working authentication. And you did that efficiently.
Let's move further to understand how authentication is wired so you can modify things if you want and/or need to.